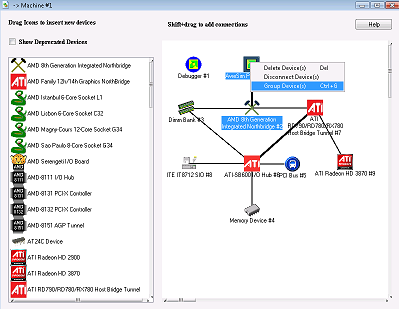
SimNow Device Groups: application core, GUI and console:
Example of SimNow
show devices GUI with a particular hardware platform. I implemented the
GUI editor features, and the device grouping feature. Notice this is the "Machine
#1"
device, which is the root node for a machine (hardware platform) in the (composite design pattern).
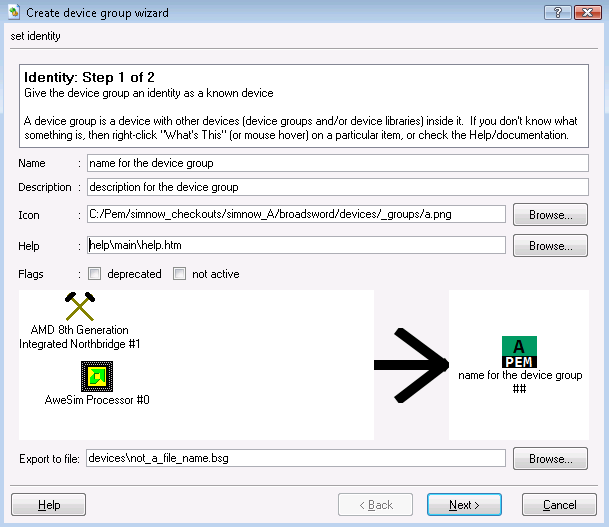
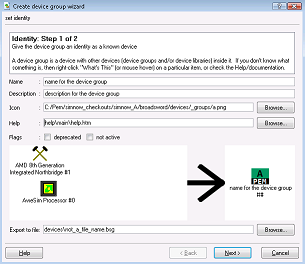
Creating a device group also allows default configuration and state (for
when you instantiate a known device into a created device), internal to external
port mappings. Here's an example of the GUI wizard when grouping devices
into a device group:
Everything you can do in SimNow in the in the GUI can also be done on the
console, using SimNow automation commands. Here is a simple example of
using the SimNow console. This example includes referencing the device
group tree on the console, which is one of the things I added to SimNow's
automation commands.
1 simnow>
shell.Location "-> Machine #1 -> ATI Radeon HD 3870"
"-> Machine #1 -> ATI
Radeon HD 3870" 350 227
1 simnow> shell.Save fileName.bsd
info: Saving
device #0 "AweSim Processor"
info: Saving device #1 "Debugger"
info:
Saving device #2 "AMD 8th Generation Integrated Northbridge"
info: Saving
device #3 "Dimm Bank"
info: Saving device #4 "Memory Device"
info: Saving
device #5 "PCI Bus"
info: Saving device #6 "ATI-SB600 I/O Hub"
info:
Saving device #7 "ATI RD790/RD780/RX780 Host Bridge Tunnel "
info: Saving
device #8 "ITE IT8712 SIO"
info: Saving device #9 "ATI Radeon HD 3870"
BSD
Save completed!
1 simnow>
SimNow Command Regressions framework:
I designed and implemented SimNow's regressions framework in Python,
interfacing with the SimNow automation commands interface. The basic
design includes separate layers/modules:
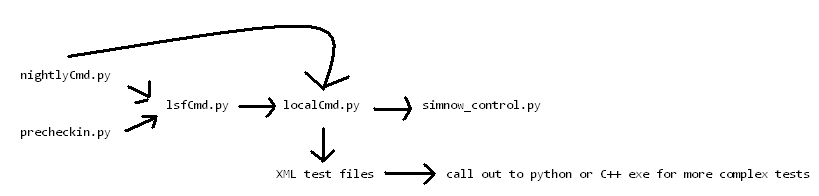
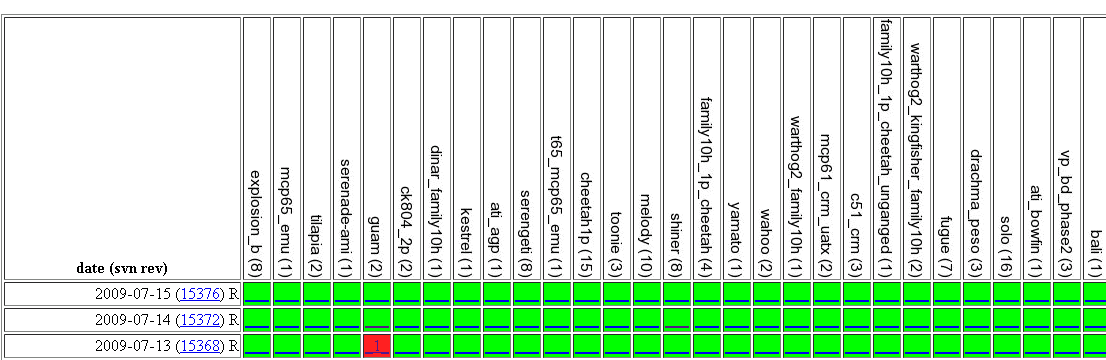
I setup nightly runs for both Windows (on a lab
machine, spawning multiple subprocess) and Linux (using AMD LSF distributed
computing). When you run a test (or the nightly runs), you get an email
result with a link to a simple PASS/FAIL web page (robust detailed logs) (the
red number 1 in this screen shot means there was a FAIL for 7/13's nightly):
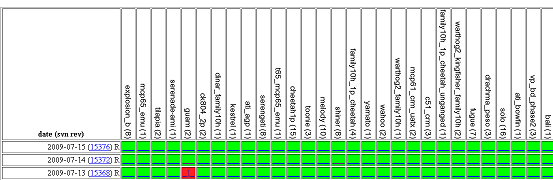
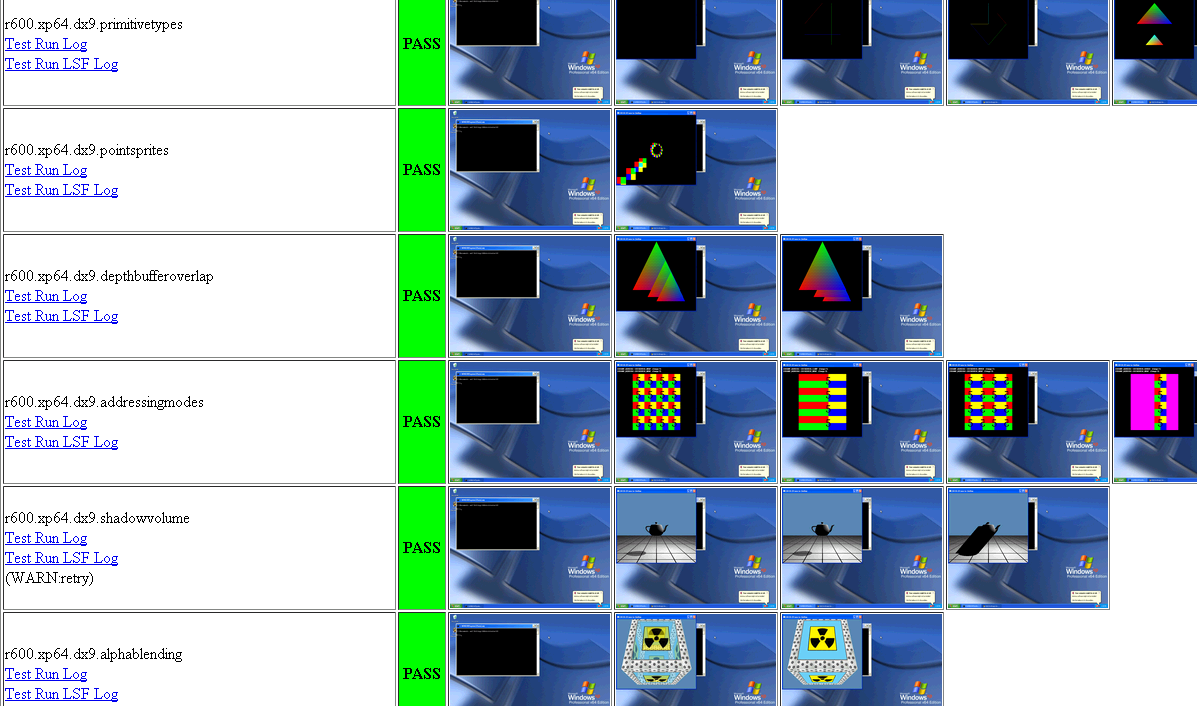
Each box in
the main web page has links to a summary for each test. Here's an example
of that sub web page for some GPU tests:
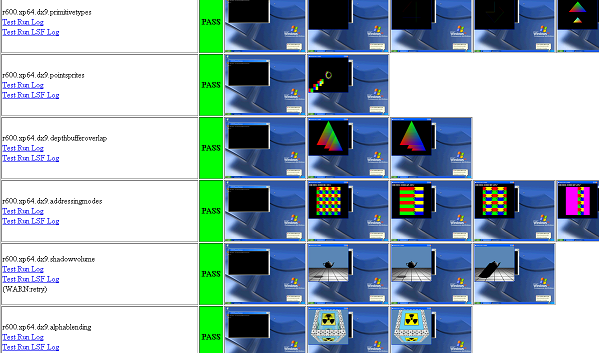
SimNow GPU Device, and GPU Regressions:
The VGA
screenshots in these checkpoints are from the VGA frame buffer of the simnow
device model. Notice how, for example, the texture addressing look
correct. This means the SimNow GPU device model has correctly implemented
texture addressing modes (that's an example of something that the GPU hardware
does). So my C++ application calls DirectX functions, and these DirectX
functions use functionality of the hardware GPU. In this case, the GPU
hardware is actually a software GPU device model, so the texture addressing is
implemented inside SimNow C++ code. Implementation of SimNow's GPU device
model is based on ATI hardware doc, DirectX doc, and OpenGL doc; but we don't
know if it works until we run a GPU application inside SimNow (such as Windows
DirectX C++), and debug it.
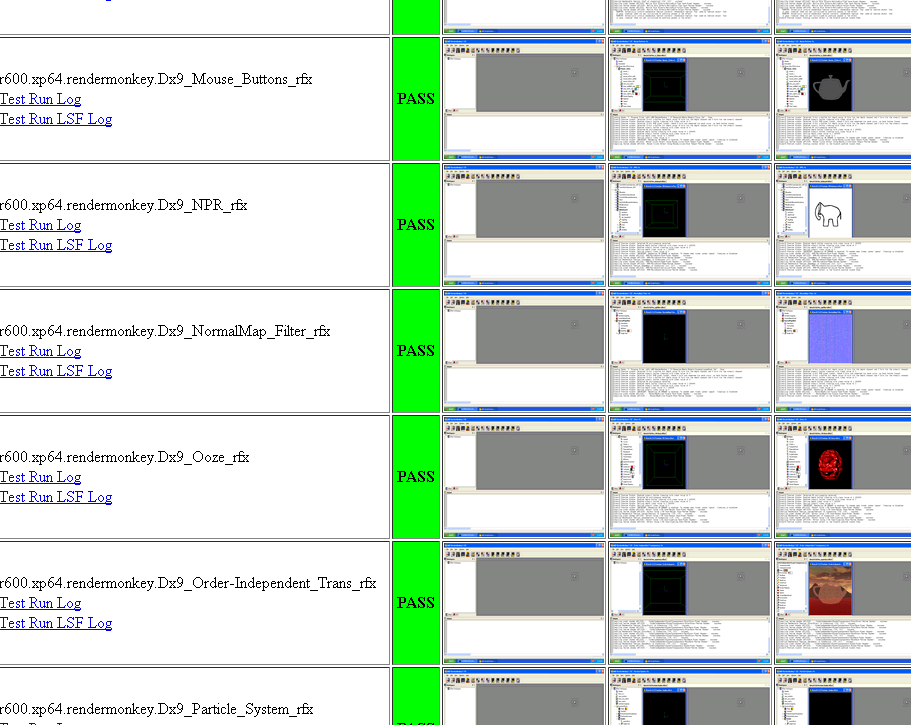
I also wrote tests that run ATI RenderMonkey
example shaders inside SimNow:
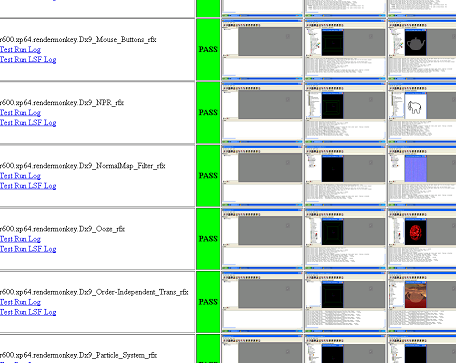
The
GPU device model implements the GPU instructions in C++. We started on a
GPU JIT shader path to optimize this. It's interesting to mention that
even the standard Windows XP GUI makes some use of the GPU shaders such as to
render simple shadow lines for an explorer.exe window:
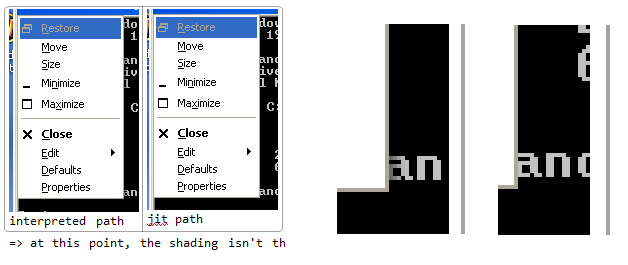
So, a high
level description, there were two things. One, help test debug implement
GPU model. Two, start to implement GPU JIT shader path.
Command Regressions XML:
Here's an example of a test's
XML, for DX9 texture addressing mode test:
<!-- TEXTURE ADDRESSING MODES -->
<test name="r600.xp64.dx9.addressingmodes">
%XP64_On_Mako_With_R600%
<reg_cmd>keyboard simnowGPUdx09.exe -e
TexturedQuad_AddModes\r</reg_cmd>
<checkpoint
image="r600_xp64_AddModes_UVwrap.png" simTimeRel="0.75">%mask_taskbar_plus_1280x768%</checkpoint>
%Close_DX9App%
<reg_cmd>keyboard simnowGPUdx09.exe -e
TexturedQuad_AddModes -k "{F1}" \r</reg_cmd>
<checkpoint
image="r600_xp64_AddModes_Uclamp.png" simTimeRel="0.75">%mask_taskbar_plus_1280x768%</checkpoint>
... etc deleted the rest ...
</test>
The %Close_DX9App% is an example
of a macro
Here's an example of a simple test which boots Windows inside
SimNow on a particular hardware platform with a particular HDD disk image:
<test name="fugue.hdd.winxp-32">
<sim_cmd>shell.open %bsd_path%fugue.bsd</sim_cmd>
<sim_cmd>%cmos.settime_default%</sim_cmd>
<sim_cmd>ide.Image master %testFiles%general/hdd/winXP_MP_raw.hdd</sim_cmd>
<checkpoint image="fugue_winxp-32.png" simTimeRel="9.3">
<mask x1="554" y1="430" x2="639" y2="479"/>
</checkpoint>
</test>
A high level description of tests:
* <sim_cmd>'s calls SimNow automation
commands
* <checkpoint> does a VGA compare after waiting a specified number
of sim sec
* there are some other XML test features, including (<reg_cmd>python)
which lets you interface to a python test (or C++ exe etc)
The
<checkpoint> does a pixel compare for the VGA between run image vs. the
reference image. The <mask> tells us to ignore a certain section of the
VGA pixels, such as a blinking console cursor.
Many of the tests use this
simple XML format which is parsed for particular error checks, generates the web
pages, and makes most test writing simple and easy and robust. However,
you can call out to python for more complicated tests, such as our CPU
regressions, which calls out to python, and then runs C++ executables:
<test
name="cpu" hostTimeOutHr="12">
<reg_cmd>python cpu.py RunCpuReg ()</reg_cmd>
</test>
The test framework has a lot of robust features that have evolved
over the years, including useful options, simplified precheckin, lots of robust
logs to help determine cause for any test fail, tools to help create vga
checkpoints png reference images and masks.